|
Lisp »Tips 'n Tricks
»Lisp & 3dmesh
Una mesh 3d viene costruita definendo il numero di vertici rispetto alla direzione M e alla direzione N e inserendo le coordinate x y z di ciascun vertice.
Esempio:
3dmesh
Dim M della mesh : 2
Dim N della mesh : 2
Vertice (0,0) : 10,10,-1
Vertice (0,1) : 10,20,1
Vertice (1,0) : 20,10,1
Vertice (1,1) : 20,20,0
Il processo per generare una mesh è quindi molto lungo e di conseguenza è facile l'errore; questo è uno di quei casi dove l'implementazione in AutoLISP di un comando CAD è necessario e non superfluo.
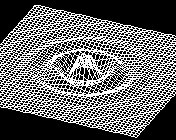
Come esempio d'uso del comando 3dmesh ecco f3dm un lisp che traduce uno script di Python per generare funzioni 3D *
f3dm
;|
   f3dm Copyright (C) 2005 by Claudio Piccini.
   All rights reserved
   www.cg-cad.com

   Generatore di funzioni 3D

   Traduce Function_plotter.py (C) by C. Wartmann
   Oktober 1999
|;

(defun pow2 ( a )(setq a (* a a)))

(defun c:f3dm ( / snapp
                  M N
                  xw yw
                  x y z r
                  distZ distZZ
 )
 (setvar "cmdecho" 0)
 (setq snapp (getvar "osmode"))
 (command "_osnap" "_non")

 (setq xw 0.5 yw 0.5)

 ; dim M mesh
 (while
  (progn
   (initget (+ 2 4)) ; M>0
   (setq M (getint "\n Dim M della mesh [2..256] <50>: "))
   (if (= M nil)(progn (setq M 50) nil) T)
   (if (and (>= M 2)(<= M 256)) nil T)
  )
 )

 ; dim N mesh
 (while
  (progn
   (initget (+ 2 4)) ; N>0
   (setq N (getint "\n Dim N della mesh [2..256] <50>: "))
   (if (= N nil)(progn (setq N 50) nil) T)
   (if (and (>= N 2)(<= N 256)) nil T)
  )
 )

 (initget (+ 2 4)) ; distZ>0
 (setq distZ (getreal "\n Disturbo asse Z <10>: "))
 (if (= distZ nil)(setq distZ 10))

 (setq distZZ (/ distZ 2))

 (command "3dmesh" M N)
 (setq y 0)
 (while (< y M)
  (setq x 0)
  (while (< x N)
   (setq r (sqrt (+ (pow2 (- x (/ N 2)))(pow2 (- y (/ M 2))))))
   (setq z (* (sin (* r xw))(cos (* r yw))(exp (/ (* -1 r) distZZ)) distZ))
   (command (list x y z))
   (setq x (1+ x))
  )
  (setq y (1+ y))
 )

 (setvar "osmode" snapp)
 (command "_redraw")
 (setvar "cmdecho" 1)
 (princ)
)
;;;eof
|
Test del Lisp
Command: f3dm
Dim M della mesh [2..256] <50>: Invio
Dim N della mesh [2..256] <50>: Invio
Disturbo asse Z <10>: Invio
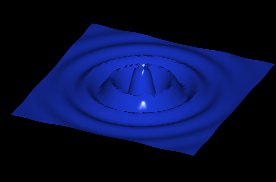
Command: f3dm
Dim M della mesh [2..256] <50>: Invio
Dim N della mesh [2..256] <50>: Invio
Disturbo asse Z <10>: 15
(*) C. Wartmann, Blender, la guida - 2001, Mondadori
# Function_plotter.py, Oktober 1999
# C. Wartmann@bigfoot.de

import Blender

from Blender import NMesh,Object
from Blender.NMesh import Col
from math import sin,cos,sqrt,exp

xw=0.5
yw=0.5
xmax=36 # x resolution
ymax=36 # y resolution

me2=NMesh.GetRaw()

# crea i vertici
for y in range(0,ymax):
   for x in range(0,xmax):
      r=sqrt((x-xmax/2)**2+(y-ymax/2)**2)
      z=sin(r*xw)*cos(r*yw)*exp(-r/5)*10
      v=NMesh.Vert(x,y,z)
      me2.verts.append(v)

# collega i vertici alle facce
for y in range(0,ymax-1):
   for x in range(0,xmax-1):
      a=x+y*ymax
      f=NMesh.Face()
      f.v.append(me2.verts[a])
      f.v.append(me2.verts[a+ymax])
      f.v.append(me2.verts[a+ymax+1])
      f.v.append(me2.verts[a+1])
      me2.faces.append(f)

NMesh.PutRaw(me2,"Function",1)
Blender.Redraw()
|
Lisp »Tips 'n Tricks
Ultimo Aggiornamento_Last Update: 5 Agosto 2005
|
|